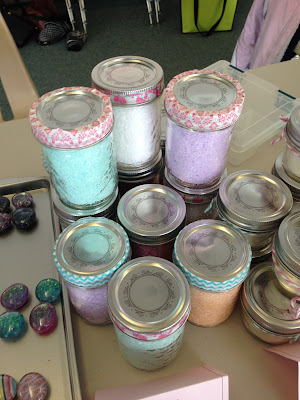
My district had a Valentine's Day tea/craft sale/ bake sale and each unit was asked to provide items to sell. Our unit had already planned our year and could not fit in making crafts for the sale so I whipped up a few things on behalf of the unit. As you have probably figured out I love taking pictures so I thought I would share what I made. :)
All of these craft ideas came from Pinterest (my favourite website ever!!) and were super easy. They could be used as a unit activity or made as thank you gifts for your co-Guiders!
#1 Bath Salts!
I made these bath salts by using Epsom Salts, soap dye, rose and eucalyptus essential oils, and of course some soap glitter! I made a number of different colours and scents of bath salts by mixing them in a bowl and then pouring them into a mason jar.
They take about two or three days for them to set completely so I sealed them up and let them sit until the sale. I decorated the mason jars with some washi tape (I know sooo Pinterest hehe) and then sold them for $3 a piece. I am thrilled to say they all sold fairly quickly and they were so easy, cheap, and fun to make!
#2 Mason Jar Candles!
I have made candles before and I have to say they are far more impressive than they actually are to make. I find that the easiest way to do this is to buy a candle and then melt the wax down into the container you are using, it is much cheaper than buying wax at the craft store. All you need is a large pillar candle, I got this one at Ikea for about $5, waxed cotton string or pre-made candle wicks (this is really important because you will be burning it), and some kind of container to hold your new candle in- to go with the theme I chose a tiny mason jar.
The first thing you need to do is cut the pillar candle into pieces, remove the wick, and put a chunk of wax in a double boiler. Make sure that you always have water in the pot and keep your stove on a medium-low heat so you don't burn anything.
Once the wax is melted, measure a piece of string to fit your container and use a little bit of wax to attach it to the bottom of the jar. Then take a pencil, or something like it, and wrap the top of the wick around it so you can pour the wax in. Fill the jar almost to the top and and then let it set for about 10 minutes. After that time take a toothpick and poke holes all around the top to let out the air that might have been trapped inside. Let the candles solidify for at least 45 minutes and then fill in the holes with more melted wax to fill the container. Leave the candle to completely harden for 24 hours.
To finish these candles off I added some coloured string that I got at Michael's and voila! a pretty cute little candle for only $3!
#3 Glitter Magnets!
I did a variety of this craft with my students last year for Mother's Day and they turned out so well I wanted to try them again using glitter instead of paper. To make these magnets you will need magnets- I find the ceramic ones work best, glass marbles- I get them at the dollar store where the candles and picture frames are, Mod Podge, heavy duty glue (not pictured)- I use E6000, and GLITTER!!
Coat the glass marble in Mod Podge and then make a small pile of glitter on a piece of wax paper. Put the glass marble face down and twist it around in the glitter. Once the glue and glitter is dry use Mod Podge to seal the back of the magnet so glitter doesn't get everywhere.
I forgot to take a picture of the magnets on the back, but when the back coat is dry use your heavy duty glue to glue the magnet on. MAKE SURE YOUR MAGNETS ARE FAR ENOUGH APART FROM EACH OTHER! They will slip around on the back a little bit when they are first glued on so you have to watch them and adjust the magnets until the glue becomes tacky. If your magnets are too close together they will attach to each other and just make a sticky mess!
For the sale I arranged the magnets in groups of 4 and sold them for $3. They are displayed on a cookie tray and were adorable!
I am proud to say that all of my items sold out and I was happy to contribute functional and cute crafts to the sale.


No comments:
Post a Comment